Friday, July 31, 2009

Add Panel Molding to a Wall


Hi Friends,

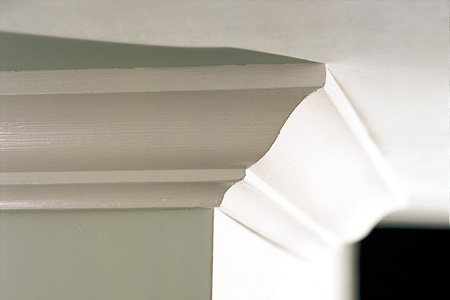
Architectural detail is always a plus. Try adding panel molding to your space. Its a weekend project that adds dimension to your walls for less than a $100. This truly delivers a huge bang for your buck. Although, our picture has very decorative molding the same look can be achieved with standard grade molding. Follow the steps below to get the job done this weekend: Happy Molding!

Steps:

1. Prime and paint the molding and let it dry.

2. In our room, our panels are all the same height, but the width varies. Measure your walls and determine the appropriate dimensions for your paneling. Standard chair rail height, which is 32 inches above the floor, is an appropriate height for the panels.

3. Miter cut the molding to the desired length and width.

4. Make a reference line around the room to mark the top point of your molding. Use a level to make sure your lines are straight and evenly spaced. Continue to use the level while assembling to make sure you are attaching the molding evenly.

5. Attach the molding with a nail gun.

6. Use putty to fill in the nail holes and touch up the paint.

Check back for more ideas and enjoy your new panel molding.

Your kind contribution will allow us to continue sharing great, no cost and cost saving ideas for your space. Click the "Donate" button below to make a contribution. Thank you!


Live well,
Yvonne

Thursday, July 30, 2009

How To Install Crown Molding


Hi Friends,

In our "Transitional Master Bedroom in Neutral" feature, I promised instructions on adding crown molding to your space. Below are the instructions which will add architectural detail to any room; another weekend project. An average room will take approximately 6 to 8 hours at a cost of $100 to $150 at your local hardware store.

Steps:

1. Paint crown molding before installing.

2. Start in one corner, working around the room. In order to account for out-of-square corners, cope the molding in the corners instead of miter cuts.

3. Once all the molding is up, cover any gaps/seams with caulk.

To Cope Molding:

1. Install the first piece of molding on the most noticeable wall.

2. Cut a miter on the second piece. Place the molding in your miter box and cut an open miter, which is a 45-degree cut where the back of the molding is longer than the front. Once the cut is made, you should see the cut grain from the front of the molding.

3. Use the edge of a lead pencil to highlight the line where the face of the molding meets the cut grain to get the exact profile of the molding.

4. Using the coping saw, cut along the highlighted line. Hold the saw on a slight angle to give it a back-cut, so that you're removing more material from the back of the molding. This gives the joint a much tighter fit.

5. Nail into the ceiling and the wall. Fill the holes and touch up paint.

You can do this, however, your local hardware store or home improvement center can miter cut the molding for you but it will cost. If you elect to have pre-cut molding be sure to double check your measurements.

Check back for more ideas, instructions and enjoy your crown molding project.

Your kind contribution will allow us to continue sharing great, no cost and cost saving ideas for your space. Click the "Donate" button below to make a contribution. Thank you!


Live well,
Yvonne

Wednesday, July 29, 2009

Feng Shui Living


Hi Friends,

Lets talk about Feng Shui. The Feng Shui grid is a vital part of any Feng Shui practice in the home. It is what provides the guide for where to place items in order to improve the flow of Chi and bring optimal positive energy into the home.

The above Feng Shui grid shows the energetic areas in your home that are responsible for different aspects of your life. You should place this grid on top your home plan to identify the specific areas of the grid.

The "Entrance" part of the grid indicates that you should view your home spots from the main entrance in accordance with the grid.

What is Feng Shui? This is a simple question that can be difficult to answer. Feng Shui is an ancient art and science developed over 3,000 years ago in China. It is a complex body of knowledge that reveals how to balance the energies of any given space to assure the health and good fortune for people inhabiting it.

"Feng" means "wind" and "shui" means "water" (pronounced fung-shway). In Chinese culture gentle wind and clear water have always been associated with good harvest and good health, thus "good feng shui" came to mean good livelihood and fortune, while "bad feng shui" came to mean hardship and misfortune.

Feng Shui is based on the Taoist vision and understanding of nature, particularly on the idea that the land is alive and filled with Chi, or energy. The ancient Chinese believed that the land's energy could either make or break the kingdom, so to speak. The theories of yin and yang, as well as the five feng shui elements, are some of the basic aspects of a feng shui analysis that come from Taoism.

The main tools used in a feng shui analysis are the Compass and the Ba-Gua. The Ba-Gua is an octagonal grid containing the symbols of the I Ching, the ancient oracle on which Feng Shui is based. Knowing the Bagua of your home will help you understand the connection of specific feng shui areas of your home to specific areas of your life.
---Rodika Tchi---

Hopefully this has been helpful.

Check back for more decorating ideas and updates.

Your kind contribution will allow us to continue sharing great, no cost and cost saving ideas for your space. Click the "Donate" button below to make a contribution. Thank you!


Live well,
Yvonne

Tuesday, July 28, 2009

Transitional Master Bedroom in Neutral


Photo by Mayer & Bowden Photography

Hi Friends,

Is it time to make-over your bedroom? If so, think about going Neutral. The use of tone-on-tone colors in a bedroom is calming for the soul and creates a calming environment. Neutral colors in varying values are your best choice for creating a room that lulls you to sleep.

Although, this is an elegant room, you can recreate a similar effect for a fraction of the cost. Establish a seating area around the ottoman. More than likely you have two chairs that are setting in your spare room or even the garage. Repurpose them for this space, its a no cost option that is also good for the environment.

Your local hotel surplus outlets and resale furniture shops have large selections of furniture, most in very good condition. Check for a similar bed frame and upholster the headboard yourself; another weekend project. Use your existing mattress. If you don't have night stands, lamps and an ottoman in a spare room or the garage, check for these at the home surplus outlets, furniture resale shops or even yard sales.

Moving on to the window treatments. Make a dramatic statement, hang them from ceiling to floor which will make the room appear larger. Its a lot of fabric but again this doesn't have to be a daunting task or break the bank. Visit your local fabric outlet, check the clearance tables and don't hesitate to ask if they offer discounts or have a mail list for coupons.

Check back for instructions on:
- Crown Molding Installation
- Headboard Upholstery
- Ottoman Upholstery
- No-Sew Drapes

You don't have to travel far to enjoy the comforts of a 5-star hotel. Create your own at-home bedroom getaway with inspiration from chic hotel-style ideas you find here. Remember you can work at your own pace, check back for updates and instructions but most important, take ownership over your room design.

Enjoy your weekend projects!

Your kind contribution will allow us to continue sharing great, no cost and cost saving ideas for your space. Click the "Donate" button below to make a contribution. Thank you!


Live well,
Yvonne

Monday, July 27, 2009

How To Make Roman Shades


Hi Friends,

Today we are going to learn how to make roman shades. You can change the way you view your space by simply adding window treatments. Its just another layer to dress up your space. Follow the instructions below and enjoy your new window treatments:

Steps:

1. Measure the width of the window. To determine the necessary length, use this formula: divide the window length by five, and then add that number to the length of the window and add seam allowances. For example, a 35-inch long window divided by five is seven. Seven plus 35 equals 42 plus one inch for seam allowances equals 43. Cut the fabric and lining according to your measurements.

2. Pin the fabrics with right sides together and trace/cut scallops along the bottom. Sew the two pieces together, leaving about a six-inch opening along the top in the middle for turning. Snip small cuts in the seam allowances along the scallops so they lay flat, and then turn the shade right side out. Iron the edges so they're crisp and sew the opening shut.

3. Sew one side of hook and loop tape along the top edge of the shade on the lining side. Measure and mark the lining along both sides (every five inches, and then one inch, then another five inches, and then one inch) to the bottom of the shade. Fold and pin the one-inch areas to the back of the shade to create half-inch flaps. Once they are sewn in, mark along each flap every six to eight inches, depending on the width.

4. Count the number of marks along one flap and cut that many cords at least double the length of the shade plus one shade width. Use a needle to sew the cording through the flaps at the marks, starting at the bottom and working up the shade (put a large knot at the bottom to keep the cording from pulling through).

5. To keep the shade sturdy and neat, slip a wooden dowel into the bottom flap.

6. Cut the header board to the window width and staple the other side of the hook and loop tape to one narrow edge of it. Attach screw eyes to the adjoining side to line up with the cording on the shade.

7. Attach the header to the shade with the hook and loop tape; feed the cords through the screw eyes, and then tie them together at one end.

8. Screw the header board to the window frame.

Tip: If the length doesn't come out evenly, make the bottom scallops a little bit longer to make up the difference.

Check back for more ideas and enjoy your roman shades.

Your kind contribution will allow us to continue sharing great, no cost and cost saving ideas for your space. Click the "Donate" button below to make a contribution. Thank you!


Live well,
Yvonne

Saturday, July 25, 2009

Great Room, Small Space


Hi Friends,

Small spaces are becoming more common place. Condo and Townhouse living is very popular with empty nesters and young couples alike. Accomplishing an even-flow between two open spaces makes for a fluid transition from one area to another, seamless living.

Organic materials as a centerpiece gives an abstract spin on a space and creates an inexpensive focal point in the dining area. The adjoining living area is accentuated by silver floor lamps and the dark wood grounds the light colors in the space. Ceiling to floor window treatments lends to the dramatic high ceiling and draws the eye up to this huge architectural feature.

Recreate a similar setting in your home at a fraction of the cost. Check out hotel resale stores for astronomical savings on furnishings in excellent condition.

Check back for more ideas and enjoy redecorating your living space.

Your kind contribution will allow us to continue sharing great, no cost and cost saving ideas for your space. Click the "Donate" button below to make a contribution. Thank you!


Live well,
Yvonne

Friday, July 24, 2009

Cluster Photo Arrangement


Hi Friends,

Artwork doesn't have to be expensive to look good. Follow the below steps to successfully implement artwork in your space for less, its a great idea:

Steps:

1. Select a favorite photo to enlarge, and determine the desired dimensions for the photo enlargement. Take the image to a local photo copy center to have it enlarged.

2. Determine the number of pieces you’d like it divided into, then buy the appropriate size and quantity of frames.

3. Lay the enlarged photo on a flat surface. Remove the glass from the frames and lay them in a grid over the image which will allow you to determine exactly which portion of the photo you’ll be able to use.

4. Trim off any excess from the photo until the image matches the size of the glass grid on top of it.

5. Remove the glass and turn the image upside down, so that the back of the photo is facing up. Using a ruler and straight edge, draw a pencil grid on the back of the photo, so that each section is the same size as the glass from the frames you purchased.

6. With the grid drawn out, number each piece so that you’ll be able to reassemble it in the proper order once it’s been cut. Cut the photo along the grid lines, and frame each piece separately.

7. Determine where the images will hang. It’s easiest to start in one corner and work across but be sure to use a level to keep everything in line. Use a stir-stick or ruler to keep a thin space between each frame.

8. For quick and easy hanging, simple attach hook-and-loop tape to the back of each frame then stick them to the wall. This will allow you to adjust the frames to get the perfect orientation on the wall. If you prefer, use a hammer and nails to hang the pictures.

You can also apply this same concept to a map or a picture of your pet, child or spouse.

Check back for more inexpensive ideas.

Your kind contribution will allow us to continue sharing great, no cost and cost saving ideas for your space. Click the "Donate" button below to make a contribution. Thank you!


Live well,
Yvonne

Wednesday, July 22, 2009

Your Space, Your Life!

Hi Friends,

The way you feel, the way you approach everyday life has a lot to do with your surrounds. Living in a space that you feel good about will make you feel good about you.

Gurus, motivational speakers and self-help books tell us that we project to others what we feel about ourselves. Therefore, it stands to reason that your comfort zone, your home, should be a place that makes you feel good about you. Look around your home or living space; do you feel good? When you walk in your door; is it comforting? Are you relaxed? If not, there are simple steps to change that in a fairly inexpensive and reasonable time-frame.

You can make simple, inexpensive changes to your space. Paint is the most inexpensive way to dramatically change a room. If you have white walls and not comfortable with changing to a bold color, think about neutrals like light taupe, beige or even a light gray. These colors are not over-bearing but will instantly change the look of your space.

Your living space is as important to your mental self-esteem as what you wear so take time to make your space one that makes you feel good.

Check back for more topics on ways to improve your living space and check out "Designing On A Budget" for money-saving ideas.


Your kind contribution will allow us to continue sharing great, no cost and cost saving ideas for your space. Click the "Donate" button below to make a contribution. Thank you!


Live well,
Yvonne