Courtesy of Cindy Hopper, Skip to My Lou
Merry Christmas Friends,
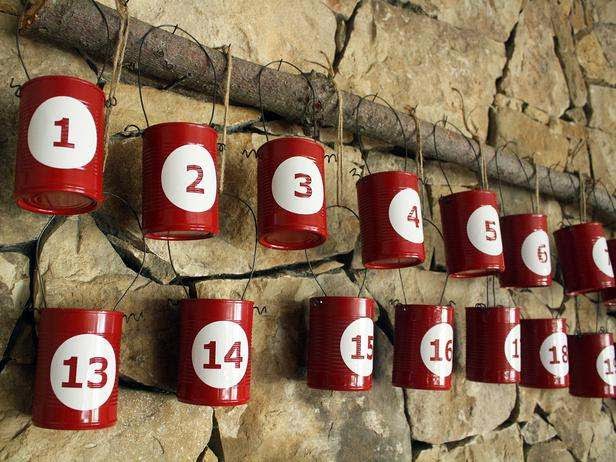
Hopefully, everyone enjoyed their Turkey Day. Now, Christmas is just around the corner. We offered some ideas to recycle and "Go Green" during the month of November so lets continue that trend with recycled cans that create a one-of-a-kind Advent calendar. Fill each date with a toy, candy, or an idea for family fun.
Materials Needed:
- 24 recycled tin cans, cleaned
- red spray paint
- 24 numbered stickers
- 24 pieces of wire, approximately 12 inches each
- 12 lengths of twine, approximately 12 inches each
- drill
- log with nails for hanging
Decorate the Cans and Fill
The Advent calendar is made with recycled cans. Make sure to completely clean the cans before you use them for the project. First, spray-paint the outside of the cans. Once they're dry, drill holes in the sides of the cans. Take the pieces of wire and stick each end through the holes in the cans, bending the wire so that it creates a handle. Add a spiral on the each end of the wire by wrapping it around a pencil. The white-vinyl numbers in the pictures were cut on a Silhouette machine, but any set of numbered stickers would work.

Create a Display
Hammer long nails through a board, a piece of driftwood or a large branch. Attach half of your cans to the nails. Loop a length of twine through the handle of half the cans and then hang them from the wood to add a second row.
Fill the cans with a tiny sweet or trinket for each child and then a slip of paper with an idea for a family activity...
Check back for more great ideas from your friends at Interior Design.
Merry Christmas!
Your kind contribution will allow us to continue sharing great, no cost and cost saving ideas for your space. Click the "Donate" button below to make a contribution. Thank you!
Live well,
Yvonne
No comments:
Post a Comment